Monday 21 July 2014

Oracle EBS Release 12 Initial Configuration

Whenever we want to start the Oracle Configuration, a question comes in mind that what should be the first step. This is definitely a valid question and of course the most important one. This post in Blog is one of the important post for Oracle Configuration because once we start the configuration then we just have to follow the sequence and that is all.

First of all Oracle Software is installed on the server by technical personnel.
After this being the functional consultant we have to follow some initial steps before going to start the configuration of a specific module. This is the most complete summary of the LUCKY SEVEN steps for Oracle Initial Configuration.

STEP#1-User name, Password and Responsibilities

From the “SYSADMIN” user name which is a seeded / default user, a user name is created in the system to do further configuration. The password of ‘SYSADMIN’ user is “sysadmin” for the first time. For this purpose go to your browser and give URL of Oracle Instance in address bar. For example “http://erpapps.ABC.com:8000/”. 
Navigation Path: System Administrator>Security>User>Define

STEP#2-Employee Creation & Assignment

When a User is created as per the above step, an employee for that user is required to be created to make that user as employee under a business group. 
Navigation Path: Global HRMS Manager>People>Enter and Maintain

STEP#3-Default Country Profile

This is the default source for the Country field for all address regions and is used by the Flexible Address Formats feature, the Flexible Bank Structures feature, and the Tax Registration Number and Taxpayer ID validation routines.
This profile can be set to any valid country listed in the Maintain Countries and Territories window and can be set to a different value for each user.
If the Default Country profile option is not defined, Receivables use the value of the Default Country field in the System Options window as the default when you enter addresses.
The Flexible Bank Structure, Tax Registration Number, and Taxpayer ID validation routines are only performed for customers and banks in the home Country. If the current transaction does not have a Country value, the Default Country profile value is used to determine whether validation is required. If the Default Country profile is not defined, validation will not be performed.
Users can see and update this profile option.
Set “Default Country” profile option as Pakistan or as the case may be at site level. 
Navigation Path: System Administrator>Profile>System
Profile Options are set at following four levels:
LevelPurpose
SiteThis is the highest level. If we set any profile option at this level then this will prevail overall for all applications in Oracle. But if we set any profile option at Application, responsibility or User then this will override the Site level.
ApplicationThis is the second level. If we set any profile option at this level then this will prevail over that application. But if we set any profile option at responsibility or User then this will override the Application and Site level.
ResponsibilitiesThis is the third level. If we set any profile option at this level then this will prevail for that responsibility. But if we set any profile option at User then this will override the Responsibility, Application and Site level.
UserThis is the lowest level. If we set any profile options at this level then this will prevail for that user.

STEP#4-Creating Location

Locations have various usages assigned to them such as:
  • Bill to (where suppliers send invoices)
  • Ship to (where suppliers send product)
  • Office (identifies a business address where employees are located)
Locations can be linked to one or many organizations 
Navigation path: Legal Entity Manager>Legal Entity Configurator
Note 1: This is recommended to create legal addresses equal to the number of Operating Units   
Note 2: Alternatively locations/addresses can be created in Inventory locations.

STEP#5-Create Jurisdiction

Tax Jurisdiction is nothing but area where we have multiple Tax Rates. We can define multiple Tax Rates under one Jurisdiction. We can create Jurisdiction for category Income Tax in legal entity manager. 
Navigation path: Legal Entity Manager>Legal Entity Configurator

STEP#6-Define Organisation Lookups

Lookup is something which is just for reporting purposes. But there are some lookups which should be created or enabled for configuring oracle. This is one of them. 
Navigation path: Global HRMS Manager>Other Definitions>Application Utilities Lookups

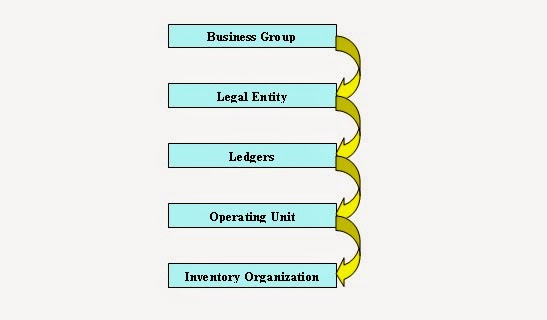
STEP#7-Define Business Group

A business group is a basically Human Resources organization to which you assign employees. You assign each operating unit to a business group in the financial options setup. You can assign the same business group to different operating units including to operating units in different financial sets of books. You can setup a separate business group for each operating unit if you want to segregate and maintain each group of employees separately. Oracle provides one setup business group you can use.
In case of not having HRMS (Full mode), what you have to do is, to create at least one business group to cater requirement for Oracle Financials and Manufacturing. 
Navigation path: Inventory>Setup>Organizations>Organizations

THIS IS ALL ABOUT THE INITIAL CONFIGURATION OF ORACLE.

Please contact me for any kind of detail related to this Oracle Initial Configuration including SCREENSHOTS in this regard at:
Email: raheelirshadkhan@gmail; Facebook: Raheel Irshad Khan orraheel.i.khan.14@facebook.com
Linkedin: Raheel Irshad Khan
Phone: +92-302-4381795
Request to reader: Please add more information through your comments so that we all can have better understanding.

Legal Entity Concept in Oracle R12


The above figure revise the Oracle Architecture Hierarchy. From this figure we can clearly see that after creation of Business Group next step is to create a Legal Entity. Creating Legal Entity and assigning a Ledger to it is just a matter of following steps:     Step 1 – Set Up Country Geography Hierarchy in TCA
Step 2 – Create a Legal Entity
Step 3 – Validate Legal Entity, Establishment and Registration
Step 4 – Set up a Ledger for the new Legal Entity
Step 5 – Set Up an Operating Unit
Step 6 – Associate the Operating Unit with the Legal Establishment
Step 7 – Run Replicate Seed Data
These steps will be explained in upcoming posts in specific module. The real purpose of this post is to get an understanding about the concept of Legal Entity.
Legal Entity represents a legal company for which Fiscal and Tax reports are prepared. A Legal Entity can Model to an Enterprise, a Designated Legal unit which is recognized by legal authorities in a country. Legal entity is a business entity that is known to exist to the outside world. Internal organizations or divisions are not legal entities themselves, but are just part of it. In the Multi Organization structure various legal entities could share the same ledger. Both legal entities and operating units are associated with the ledger and the relationship between the legal entity and operating unit is derived based on the ledger.
A legal Entity can be associated to Single Ledger, Multiple Legal Entities can be Associated to a Ledger.
The Legal Entity Configurator allows you to define legal entities and establishments in the Oracle system to achieve legal compliance for business activities handled by the Oracle E-Business Suite.
Navigation path: Legal Entity Manager>Legal Entity Configurator
The next post after this is the complete configuration steps of Oracle General Ledger including the Determinants for Chart Of Accounts.
Please contact me for any kind of detail related to the understanding of Legal Entity at:
Email: raheelirshadkhan@gmail; Facebook: Raheel Irshad Khan orraheel.i.khan.14@facebook.com
Linkedin: Raheel Irshad Khan
Phone: +92-302-4381795
Request to reader: Please add more information through your comments so that we all can have better understanding.

Determinants for Chart Of Accounts Segments

Accounting Flexfield is a Key Flexfield which is created to define your Chart Of Accounts (COA). A chart of accounts is a list of accounts used by a business to classify financial transactions. A good chart of accounts provides flexibility for recording and reporting accounting information, provides structure for managing business uniformly, and enhances communication across all parts of the business.

COA
5 things that should be considered for taking a decision for the Chart of Account’s segments are:
         i.            One type of information: The first of these considerations is a crucial aspect of designing a long-lived chart of accounts which means that you should have one (and only one) type of information in each segment. If the type of information in a segment is not unique, the chart suffers from a vulnerable overlapping of information across segments, creating potential inaccuracies during reporting. For example to avoid the duplication of data single segment named Cost Center can be created for department and/or location segment.
       ii.            Information not repeated: For reasons similar to those discussed above, your accounting flexfield should not repeat information that exists in other modules of EBS.
      iii.            Enough room to expand: A common downfall of chart of accounts design is to tailor the design to your current business without considering the future growth and change that are inevitable outcomes of a successful company. In the design phase, make sure to define your segment lengths to be long enough to accommodate values that will be added in the future. Failure to do so will make a segment susceptible to filling up. When designing roll-up group values, a general guideline is to increment consecutive values by at least 5 to 10 within each group.
     iv.            Use logical ranges: Expanding on what was just discussed about segment lengths, you should take care to put values for each segment into logical ranges. If you know the trends in your business, you can define an appropriate number of characters for both a segment and the ranges it contains. Don’t hesitate to increase the length of a segment to accommodate a larger range. Increasing segment length to accommodate growth lets you build flexibility into the COA structure. Ranging your values logically promotes streamlined reporting, security and maintenance. This is recommended to avoid using alpha characters because these will create problems in sequencing and sorting data in reports, assigning codes, using ranges, and when creating rules.
       v.            No reliance on spreadsheets: Spreadsheets are great tools for short, small projects, but care should be taken when using them as an extensive resource Spreadsheets are good choices when you need to organize simple data in a fast and cost-effective manner, but they are generally ill-equipped to handle accurately and efficiently transforming data from your financial systems to report results. Eliminating your reliance on spreadsheets to get the financial information you need is a best-practices consideration when designing your chart of accounts. Make sure that you will be able to get all of the information you need from the built-in reports of EBS. This will add value by giving you real-time access to information and eliminating numerous errors that are introduced when multiple employees use the same spreadsheets and are unaware of changes and updates made by others. You will get faster reports if you focus on the built-in reporting features of EBS.
All these five determinants should be kept in mind while taking decisions on Chart Of Accounts segments.

Oracle EBS Release 12 Inventory Module Configuration

Oracle Inventory

Oracle Inventory is a very important part of the Oracle E-Business Suite. Its main functionality is to manage and provide real-time transactions for our Inventory Suite. It allows us to manage our inbound and outbound logistics and to keep track of transactions in real-time. In simple words, Oracle Inventory allows us to manage items, which can be in the form of raw material, semi-finished goods, finished goods, services, and so on.

Configuration Steps

1. Define System Items Flexfield

You must design and configure your System Items Flexfield before you can start defining items in Oracle Inventory. You must indicate how many separate segments you need for an item code and how many characters should be there in each segment. Once you define the structure of your Flexfield and any applicable value sets, you must freeze and compile your Flexfield definition. System Items Flexfield Structure can only be created once in overall application so decision for its segments is very crucial. As this is a Key Flexfield so we will follow these 6 steps:
i. Create Key Flexfield Structure
ii. Assign qualifiers if required
iii. Create Value Set for each segment of Flexfield
iv. Assign Value Set to each segment
v. Add Values in each Value Set
vi. Create combinations for all segments in each structure
Navigation path: Inventory>Setup>Flexfields>Key>Segments

2. Open Values in System Item Flexfield

When we have created the value sets for each segment then the next step is to open values for each segment.
Navigation path: Inventory>Setup>Flexfields>Key>Values

3. Define Categories Flexfield

Categories are the method by which the items in inventory can be separated logically and functionally for planning, purchasing and other activities. You can use categories and category sets to group your items for various reports and programs. A category is a logical classification of items that have similar characteristics. A category set is a distinct grouping scheme and consists of categories. The flexibility of category sets allows you to report and inquire on items in a way that best suits your needs. As this is a Key Flexfield so we will follow these 6 steps:
i. Create Key Flexfield Structure
ii. Assign qualifiers if required
iii. Create Value Set for each segment of Flexfield
iv. Assign Value Set to each segment
v. Add Values in each Value Set
vi. Create combinations for all segments in each structure
Navigation path: Inventory>Setup> Key>Segments

4. Open Values in Categories Flexfield

When we have created the value sets for each segment then the next step is to open values for each segment.
Navigation path: Inventory>Flexfields>Key>Values

5. Define Stock Locators Flexfield

If you keep track of specific locators such as aisle, row and bin indicators for your items, you need to configure your Stock Locators Flexfield and implement locator control in your organization. You must indicate how many separate segments your flexfield has, how many characters each segment has, and -whether you want to validate the values that you assign to the segments. As this is a Key Flexfield so we will follow these 6 steps:
i. Create Key Flexfield Structure
ii. Assign qualifiers if required
iii. Create Value Set for each segment of Flexfield
iv. Assign Value Set to each segment
v. Add Values in each Value Set
vi. Create combinations for all segments in each structure
Navigation path: Inventory>Setup> Key>Segments
Note: Even if you do not implement locator control, you must still compile the Stock Locators Flexfield because all Oracle Inventory transaction and on-hand inquiries and reports require a frozen flexfield definition. However you do not need to configure the flexfield in a specific way.

6. Open Values in Stock Locators Flexfield

When we have created the value sets for each segment then the next step is to open values for each segment.
Navigation path: Inventory>Flexfields>Key>Values

7. Define Account Aliases Flexfield

An account alias is an easily recognized name or label representing a general ledger account number. You can view, report, and reserve against an account alias. During a transaction, you can use the account alias instead of an account number to refer to the account. As this is a Key Flexfield so we will follow these 6 steps:
i. Create Key Flexfield Structure
ii. Assign qualifiers if required
iii. Create Value Set for each segment of Flexfield
iv. Assign Value Set to each segment
v. Add Values in each Value Set
vi. Create combinations for all segments in each structure
Navigation path: Inventory>Setup> Key>Segments

8. Open Values in Account Aliases Flexfield

When we have created the value sets for each segment then the next step is to open values for each segment.
Navigation path: Inventory>Setup>Flexfields>Key>Values

9. Define Locations

Locations have various usages assigned to them such as:
• Bill to (where suppliers send invoices)
• Ship to (where suppliers send product)
• Office (identifies a business address where employees are located)
Locations can be linked to one or many organizations
Navigation path: Inventory>Setup>Organizations>Locations

10. Define Organization Calendar / Workday Calendar

You can define the inventory organization calendar or the workday calendar in both Oracle Inventory and Oracle Bills of Material. When you set out to define an inventory organization Oracle asks you to assign a workday calendar to that Inventory Organization. Organization parameters cannot be saved without a workday calendar.
In a workday calendar you specify which days are worked within your organization and which shifts are available to be worked. The workday calendar is also referred to as the manufacturing calendar or simply the inventory calendar. However, the workday calendar is separate from the Oracle General Ledger calendar.
When you define the inventory organization calendar Oracle Inventory assumes a workday pattern that includes all days, between the start and end dates of the calendar. The usual practice is to define a workday pattern of 5 days on and 2 days off for a 5 day working week or 6 days on and 1 day off for a 6 day working week. You can define one or more workday calendars and assign them to any number of organizations, and any number of organizations can share a calendar.
Navigation path: Inventory>Setup>Organizations>Calendars

11. Define Inventory Organization(s)

Two types of Inventory Organizations are found in Oracle Applications. They are defined in the same way. Both are assigned a set of books, a legal entity organization, an operating unit organization and a location.
An item master organization is used for item number maintenance and validation. This master organization serves as a data repository storing items and item attributes, master level categories and category sets, master level cross references, and numerous data defaults. On-hand balances, inventory movements and other on-going inventory activities are not performed in an item master organization. Generally, the master organization is used as the validation organization for Purchasing and Order Entry. It is recommended that a single item master organization be defined, even in multiple organizations and
Set of books environments.
In addition to the item master organization there is one or more non-master or you may say transactional Inventory Organizations. Like the item master inventory organization, the non-master organizations are assigned a set of books, a legal entity organization and an operating unit organization. The non-master inventory organization points to a master organization and looks to the master organization for master level item attributes, master level categories and other master level controlled data.
NOTE: Each organization has its own set of books/legal entity/operating unit relationship, so inventory organizations with differing Set of books or operating units may share the same master organization.
These non-master inventory organizations are the execution level organizations. They hold on-hand balances and transaction history. Here is where inventory users execute their daily activities, such as receiving and issuing material, performing cycle counts and viewing material availability and transaction history. A single organization therefore generally represents a single manufacturing site or distribution center.
Navigation path: Inventory>Setup>Organizations>Organizations

12. Define Cost Types

A cost type is a set of costs uniquely identified by name. Two cost types are predefined for you, “Frozen” (for standard costs) and “Average.” You can define and update an unlimited number of additional simulation or unimplemented cost types. Each cost type has its own set of cost controls. These cost types are defined at Inventory Organization level so first we have to select the Inventory Organization by following this navigation path.
Navigation path: Inventory>Change Organization

13. Define Financial Options

Use the Financials Options window to define the options and defaults that you use for your Oracle Financial Application(s). Values you enter in this window are shared by Oracle Payables, Oracle Purchasing and Oracle Assets. You can define defaults in this window to simplify supplier entry, requisition entry, purchase order entry, invoice entry, and automatic payments.
NOTE: Financial Options are shown in Oracle Inventory Document because Financial Options should be set before setting up Receiving Options and Purchasing Options which are the part of Oracle Inventory and Oracle Purchasing respectively.
Navigation path: Payables>Setup>Options>Financials Options

14. Define Receiving Options

Use the Receiving Options window to define options that govern receipts in your system. Most of the options that you set here can be overridden for specific suppliers, items, and purchase orders. These Receiving Options are set at Inventory Organization level so first we have to select the relevant Inventory Organization Level for which we are going to set our Receiving Options.
Navigation path: Inventory>Change Organization

15. Define Organization Access

You can specify which organizations a responsibility can access by mapping responsibilities to organizations. Once this mapping is set up, a user logging into an Oracle Inventory product is restricted to the organizations mapped to the responsibility chosen. The Change Organization window is restricted as well.
Navigation path: Inventory>Organizations>Organizations Access

16. Define Unit of Measure Classes

Unit of measure classes represent groups of units of measure with similar characteristics. Creating unit of measure classes is the first step in unit of measure management. Each unit of measure you define must belong to a unit of measure class.
Each class has a base unit of measure. The base unit of measure is used to perform conversions between units of measure in the class. For this reason, the base unit of measure should be representative of the other units of measure in the class, and generally one of the smaller units. For example, you could use CU (cubic feet) as the base unit of a class called Volume.
Navigation path: Inventory>Setup>Unit of Measure>Classes

17. Define Unit of Measure

Units of measure are used by a variety of functions and transactions to express the quantity of items. Defining units of measure is the second step in unit of measure management. The values defined in the Units of Measure window provide the list of values available in unit of measure fields in other windows.
Units of measure are not organization-specific.
Navigation path: Inventory>Setup>Unit of Measure

18. Define Unit of Measure Conversions

Unit of measure conversions are numerical factors that enable you to perform transactions in units other than the primary unit of the item being transacted. You can define:
• a conversion common to any item (Standard)
• a conversion for a specific item within a unit of measure class (Intra-class)
• a conversion for a specific item between unit of measure classes (Inter-class)
Navigation path: Inventory>Setup>Unit of Measure>Conversions

19. Define Subinventory(s)

A Subinventory is used as a holding point for on-hand inventory and generally represents a stock room, stocking area or cage used for storing material. Subinventory(s) are defined within Inventory
Organizations. An Inventory Organization may have any number of Subinventories, and an asset account is assigned to each Subinventory. Since the Subinventory entity is logical, as there is not an address or
physical location description associated with it. Clients may define Subinventories for any physical or logical grouping of inventory.
As Subinventory is defined under a specific Inventory Organization so first we have to enter into an Inventory Organization.
Navigation path: Inventory>Change Organization

20. Define Stock Locators

Stock Locators are an optional entity that may be used to represent physical locations within a Subinventory. You may choose to use Stock Locators for selected Subinventory(s) or selected items within selected Subinventory(s). If Locators are used, Subinventory and Locator track on-hand balances. Therefore, if Locators are defined to represent a shelf within a stockroom, on-hand balances on the system would show the item and quantity down to the physical location within the facility.
Oracle Inventory uses a key flexfield for Stock Locators. This presents a few limitations for its use. Only one Locator flexfield definition is allowed per installation. Therefore, if the stockroom (Subinventory) wants to track material by row, bin and shelf, it will likely define a three-segment flexfield with segments for row, bin, and shelf. If Locators are desired for another Subinventory, even in another Inventory Organization, the structure will again be 3 segments for row, bin and shelf. In addition to this limitation, Locators must be unique within an Inventory Organization. You cannot use the same Locator in different Subinventory(s) within an Inventory Organization, but you can use the same locator in Subinventory(s) in a different Inventory Organization.
Navigation path: Inventory>Setup>Organizations>Stock Locators

21. Define Category Codes

You can define an unlimited number of categories and group subsets of your categories into category sets. A category can belong to multiple category sets. You can assign a category to a category set either at the time you define a category set or at the time you assign an item to the category.
Navigation path: Inventory>Setup>Items>Categories>Category Codes

22. Define Category Codes

You can use categories and category sets to group items for various reports and programs. Category sets may be used as a means to develop custom lists of items on which to report and sort.
Navigation path: Inventory>Setup>Items>Categories>Category Set

23. Define Default Category Set

When you install Oracle Inventory, you must assign a default category set to each of the following functional areas: Inventory, Purchasing, Planning, Service, Product Line Accounting and Order Entry. Product Line Accounting is seeded with the Inventory category set. Inventory makes the default category set mandatory for all items defined for use by a functional area. If your item is enabled for a particular functional area you cannot delete the item’s corresponding default category set assignment. Default category sets are required so that each functional area has at least one category set that contains all items in that functional area. You can enable an item for each functional area by using that functional area’s item defining attribute. An item defining attribute identifies the nature of an item.
Navigation path: Inventory>Setup>Items>Categories>Default Category Sets

24. Define Item Template(s)

A template is a defined set of attribute values. When you apply a template to an item, you overlay or default in the set of attribute values to the item definition.
You can apply the same or different templates to an item multiple times. The more recent attribute values (from the last template applied) override previous values unless the previous value is not updatable (for example, the Primary Unit of Measure, which is never updatable).
Navigation path: Inventory>Setup>Items>Templates

25. Assign Organization, Subinventory(s) and Stock Locator(s) to Items

As we have discussed preciously that there are two types on Inventory Organizations. One is the Master Organization in which all the required items are opened and the other is Non-master or Transactional Organization to which items are assigned which are opened in Master Organization.
After assigning the Non-Master or Transactional Organization to an item you can assign items to a given Subinventory. Assigning items to a Subinventory does not restrict the Subinventory to that list of items rather the items are restricted to that Subinventory. Thus, you can always issue and receive unrestricted items to any Subinventory, but you can only issue and receive restricted items to their list of Subinventory(s). You activate the list of Subinventory(s) for a restricted item by setting the Restrict Subinventory(s) attribute when defining or updating items.
Similar to Subinventory, a Locator can also be assigned to an Item(s).
Navigation path: Inventory>Items>Master Items

26. Define Material Overheads (Non-Mandatory)

You can use material overhead and overhead cost sub-elements to add indirect costs to item costs on either a percentage basis or as a fixed amount in both standard and average costing organizations.
Each overhead sub-element has a default basis, a default activity, and an absorption account. The overhead absorption account offsets the corresponding overhead cost pool in the general ledger.
You can base the overhead charge on the number of resource units or percentage of resource value earned in the routing operation. Or, you can set up move-based overheads where the rate or amount is charged for each item moved in an operation. To do this, use the Item or Lot basis types.
You can base the material overhead charge on a percentage of the total value, which is earned when you receive purchase orders or perform WIP completion transactions. Or, you can use the Item or Lot basis types.
You can apply each of these sub-elements using different basis types for increased flexibility. Material overhead is earned when an item is received into inventory or completed from work in process. Overhead, based upon resources, is earned as the assembly moves through operations in work in process.
Navigation path: Inventory>Setup>Sub-elements>Overheads

27. Define Default Material Overheads Rates  (Non-Mandatory)

You can define and update default material overhead sub-elements and rates. These defaults speed data entry when defining items.
When you define items, these material overheads are defaulted into the Frozen cost type under standard costing, and into the cost type you defined to hold average rates under average costing.
Navigation path: Inventory>Setup>Costs>Sub-elements>Defaults

28. Define Item Costs (Non-Mandatory)

The Material Overheads defined are assigned to a specific Item.
Navigation path: Cost Management – SLA>Item Costs>Item Costs

29. Define Material Overhead Absorption Rules (Non-Mandatory)

For specific transaction types the defined Material Overheads can be used.
Navigation path: Cost Management –SLA>Setup>Sub-Elements>Material Overhead Absorptions Rules

30. Define Organization Shipping Network (Non-Mandatory)

Inter-organization shipping network information describes the relationships and accounting information that exists between a shipping (from) Inventory Organization that ships inventory to a destination (to) Inventory Organization.
Depending on the function security assigned to your responsibility, you can define a shipping network between the current organization and another organization or between any two organizations. The function security assigned to your responsibility determines whether you have the ability to define shipping networks for all organizations or just the current organization.
Navigation path: Inventory>Setup>Organizations>Shipping Networks

31. Define Account Aliases (Non-Mandatory)

An account alias is an easily recognized name or label representing a general ledger account number. You can view, report, and reserve against an account alias. During a transaction, you can use the account alias instead of an account number to refer to the account.
Account Aliases are defined in each Inventory Organization. For this purpose first we have to enter into an Inventory Organization.
Navigation path: Inventory>Change Organization

32. Define Transaction Source Type (Non-Mandatory)

A transaction source type is the type of entity against which Oracle Inventory charges a transaction. Along with a transaction action, it uniquely identifies the type of transaction you perform. Oracle Inventory provides the following predefined transaction source types:
• Purchase Order
• Sales Order
• Account
• Job or Schedule
• Account Alias
• Internal Requisition
• Internal Order
• Cycle Count
• Physical Inventory
• Standard Cost Update
• RMA (Return Material Authorization)
• Inventory
You can define additional transaction source types in the Transaction Source Types window. You can then use these user-defined transaction source types and predefined transaction actions to define a new transaction type. This user-defined transaction type is now a customized form of tracking transactions with which you can group and sort reports and inquiries. When you perform a transaction, you specify a transaction type and a source. For example, for a PO receipt transaction, the transaction source type is Purchase Order and the actual PO number is the source.
Navigation path: Inventory>Setup>Source Types

33. Define Transaction Type (Non-Mandatory)

A transaction type is the combination of a transaction source type and a transaction action. It is used to classify a particular transaction for reporting and querying purposes.
Navigation path: Inventory>Setup>Transactions>Types

34. Cost Period (Non-Mandatory)

Oracle Inventory provides the features you need to summarize costs related to inventory and manufacturing activities for a given accounting period and distribute those costs to the general ledger.
Cost Periods are set at Inventory Organization level so first we have to select the relevant Inventory Organization for which we are going to set our Cost Periods.
Navigation path: Inventory>Change Organization
After the configuration of these steps  we are able to make entries in Oracle Inventory.
Please contact me for any kind of detail and screeshots related to the understanding of Oracle Inventory Configuration at:
Email: raheelirshadkhan@gmail; Facebook: Raheel Irshad Khan orraheel.i.khan.14@facebook.com
Linkedin: Raheel Irshad Khan
Phone: +92-302-4381795
Request to reader: Please add more information through your comments so that we all can have better understanding.

Oracle EBS Release 12 General Ledger Configuration Steps

In previous post we discussed about the concept of Legal Entity in Oracle R12. Now we see the configuration steps involved in Oracle General Ledger.
Oracle General Ledger provides highly automated financial processing. It can import and post millions of journal lines per hour, making it the fastest and most scalable general ledger on the market. It provides tools for effective management control and real-time visibility to financial results. It also helps to meet financial compliance.
Following steps are involved in Oracle General Ledger configuration:
Step#1-Legal Entity Creation (Its detail is already discussed in previous post naming Legal Entity Concept in Oracle R12)
Navigation path: Legal Entity Manager>Legal Entity Configurator

Step#2-Accounting Flexfield
Accounting Flexfield is a Key Flexfield which is created to define your Chart Of Accounts (COA). A chart of accounts is a list of accounts used by a business to classify financial transactions. A good chart of accounts provides flexibility for recording and reporting accounting information, provides structure for managing business uniformly, and enhances communication across all parts of the business.
(In next post we will discuss the detail about the determinants which should be kept in mind while finalizing the structure of Chart Of Accounts)
When you first define your chart of accounts, you must enable Dynamic Insertion. This will enable you to create the necessary account combinations when you define your ledgers using Accounting Setup Manager. After you complete your ledger options, you can optionally disable dynamic insertion for your chart of accounts.
NOTE: You can define multiple charts of accounts per installation, or you can define a single chart of accounts that is shared by multiple ledgers within a single instance. If you use multiple charts of accounts, it is recommended that you share the same value set for the balancing segment across all charts of accounts.
Every time when we create any Key Flexfield in Oracle we have to follow 6 steps:
  1. Create Key Flexfield Structure
  2. Assign qualifiers if required
  3. Create Value Set for each segment of Flexfield
  4. Assign Value Set to each segment
  5. Add Values in each Value Set
  6. Create combinations for all segments in each structure
First step is to create Flexfield Structure.
Navigation path: Oracle General Ledger>Setup>Financials>Key>Segments
After creating segments, select each segment and assign “Flexfield Qualifier” to each segment.
Following table show the mandatory Flexfield Qualifiers for Accounting Flexfield:
Flexfield QualifierPurpose
Balancing SegmentThe segment on which Accounting Entry is balanced. Normally the segment which is representing operating unit is qualified as balancing segment.
Cost CenterThe segment which is representing departments/cost centers is qualified as Cost Center.
Natural AccountThe segment which represents nature of account i.e. Equity, Liability, Asset, Expense or Income is qualified as Natural Account. 
Recommendation as per Oracle Documentation: We recommend that you consider a standardized approach to accounting for your organization in the Oracle ledgers by using a global chart of accounts.
A global chart of accounts is a designated account structure format and set of values that all entities (Legal Entities) in a group will use. Some values within the segments will differ according to local requirements. However, each segment is designated for a specific use and therefore is consistent in its function across all ledgers.

Step#3- Opening Values in Accounting Flexfield
After creating the Accounting Flexfield structure and their value sets, we have to add values for each value set.
Navigation path: General Ledger>Setup>Financials>Key>Segments>Values

Step#4- Define Currency
Ledgers have a definitive currency used to construct the balances and can accommodate an infinite number of transaction denomination currencies. The transactions, activity, or balances can be valued in several currencies. There are three types of currencies which are:
         i.            Transaction currency: Transaction currency is the currency of denomination for a transaction document. We sometimes refer this as entered currency. When an item is denominated in a currency that is different than the local accounting currency, you might think of this as a “foreign currency” item. Transactions that are entered in currencies other than the accounting currency are automatically valued and recorded in the accounting currency using conversion rates that are stored in daily rate tables. Gains and losses based on changes in the exchange rates are calculated at settlement. Revaluation is calculated at the various dates on which you need to record unrealized exchange gains.
       ii.            Primary currency: The currency used for accounting and reporting in a ledger is called “the ledger primary currency”, although it is often referred to as the ledger’s accounting currency. A primary ledger interfaces closely with the economy in which the entities that are using that ledger are trading. For example, your local banks issue bank statements that tie to the ledger. You account for local employees’ payroll, in local currency, in the primary ledger. Local contractors and vendors are reimbursed in local currency. For these reasons, we recommend that the primary currency of a primary ledger be the local business currency.
iii.            Reporting currency: You may need to report in additional currencies to satisfy management, legal, and statutory requirements. Reporting currencies represent the data of a ledger in other currencies. Reporting currencies reflect the same chart of accounts, calendar, and accounting convention as the primary ledger. Each ledger must be assigned a primary currency. Ledgers that are not primary should also have a primary currency.
After creating COA next step in setting up Oracle General Ledger is to enable or define currencies which will be used.
Navigation path: General Ledger>Setup>Currencies>Define

Step#5- Period/Calendar Type
After enabling/defining currency next step in setup General Ledger is to make period types. You can define your own period types to use in addition to the General Ledger standard period types Month, Quarter and Year. You use these period types when you define the accounting calendar for your organization.
Each set of books has an associated period type. When you assign a calendar to a set of books, the set of books only accesses the periods with the appropriate period type. Thus, you can define an accounting calendar with periods of more than one period type; however, each set of books will only use periods of a single period type.
Navigation Path: General Ledger>Setup>Calendars>Types

Step#6- Define Accounting/GL Calendar
After creating the period types, the next step in General Ledger setup is to define Accounting / GL Calendar. Balance sheets are snapshots of your assets and liabilities at points in time, and income statements are an analysis of the change in your net wealth between each balance sheet.
Each ledger has an accounting calendar, which represents a period of time in General Ledger, defined by a start and end date. You must design your calendar based on your business and management practice. Manufacturing businesses often use calendars with periods and quarters that end on weekends and are equal, for comparability and standards calculation. Service businesses often use the regular calendar.
Navigation path: General Ledger>Setup>Calendars>Accounting
NOTE: There is often a need for an adjusting period at year end to include General Ledger transfers, account reconciliations, adjusting journals, and other period end specific tasks. Some countries have specific requirements such as a closing journal voucher that can be accommodated in an adjusting period.
All Oracle subledgers depend on the General Ledger calendar. You can associate a common calendar with multiple ledgers.

Step#7- Define Transaction Calendar
Each set of books for which average processing is enabled, must be assigned a transaction calendar, which is used to control transaction posting. When you define the transaction calendar, you choose which days of the week will be business days. You can also specify other non-business days, such as holidays, by maintaining the transaction calendar.
After creating the Accounting Calendar, the next step in General Ledger setup is to define Transaction Calendar.
Navigation path: General Ledger>Setup>Calendars>Transactions

Step#8- Set Sequence Profile Option
For using document sequence a Profile Option is required to set from System Administrator responsibility. This profile option assigns a document number to the any document created in the sub-ledger. Sequential numbering provides a method of checking whether documents have been posted or lost. Not all forms within an application may be selected to support sequential numbering.
Navigation path: System Administrator>Profile>System
Following table explains the different variables for “Sequential Numbering” profile option:
VariableDescription
Always UsedYou may not enter a document if no sequence exists for it.
Not UsedYou may always enter a document.
Partial UsedYou will be warned, but not prevented from entering a document, when no sequence exists.

Step#9- Create Ledger
Now, create the Ledger for legal entity. A fundamental concept in Oracle Applications is Ledger. The Ledger represents an accounting representation for an organization that is accountable in a self-contained way. A legal Entity accounts for itself in a Ledger. A Ledger provides balance ledger accounting for the accounting entity and serves as the repository of financial information.
Navigation path: General Ledger>Setup>Financials>Accounting Setup Manager>Accounting Setups

Step#10- Run Replicate Seed Data
The purpose of the Replicate Seed Data Concurrent Program is to populate the Installed modules seeded values, so that new organizations can use the seeded data.
Whenever new Organizations are created (under the Multi-org Setup, which is mandatory), running Replicate Seed data is a pre-requisite step before you can start working in the newly created organization.
The Replicate Seed Data Concurrent Program can be run for a particular Operating Unit or for all Operating Units (as it is not mandatory parameter) but you cannot run the program for a particular module, for example, Incentive Compensation.
Running this program will not damage the system because it is providing a new organization with the basic information required to set up the organization.
Caution: When running the Replicate Seed Data process ensure no users are logged-in.
Navigation path: System Administrator>View>Requests

Step#11- Create Security Profile
A security profile is created to give access to more than one operating unit.
Navigation path: Global HRMS Manager>Security>Profile

Step#12- Set Security Profile
Navigation path: System Administrator>Profile>System
Following table gives a little description of Security Profiles:
ProfilePurpose
MO: Operating UnitTo restrict access to specific Operating Unit
MO: Security ProfileTo give access of more than one OU
MO: Default Operating UnitTo appear default
NOTE: Atleast one of the profile option is required to be set out of last 2

Step#13- Set GL Ledger Name
The ledger which we have created is required to be assigned to that responsibility which will make entries in that ledger. This profile is generally set t responsibility level because there may be multiple ledgers which are required to be set for different responsibilities.
Navigation path: System Administrator>Profile>System

Step#14- Set GL: Data Access Set Profile Option
This profile is set to restrict ledger access to a responsibility. There is a default Data Access Set which we applied.
Navigation path: System Administrator> Profile>System

Step#15- Create Data Access Set (Restriction for specific OU)
Data Access Set is created to allow or restrict the access to multiple ledgers or segments in the Accounting Flexfield.
Navigation path: General Ledger>Setup>Data Access Sets

Step#16- Create Journal Categories
Journal categories help you differentiate journal entries by purpose or type, such as accrual, payments or receipts. When you enter journals, you specify a category.
Navigation path: General Ledger>Setup>Journal>Categories

Step#17- Define Document Sequences
A document sequence uniquely numbers documents generated by an Oracle E-Business Suite product. Using Oracle E-Business Suite, you initiate a transaction by entering data through a form and generating a document, for example, an invoice. A document sequence generates an audit trail that identifies the application that created the transaction, for example, Oracle Receivables, and the original document that was generated, for example, invoice number 1234. Document sequences can provide proof of completeness. For example, document sequences can be used to account for every transaction, even transactions that fail.
Document sequences can also provide an audit trail. For example, a document sequence can provide an audit trail from the general ledger into the subsidiary ledger, and to the document that originally affected the account balance.
Document sequences generate audit data, so even if documents are deleted, their audit records remain.
Navigation path: General Ledger>Setup>Financials>Sequences>Document>Define

Step#18-Assign Document Sequences
After defining document sequences, you must assign a specific sequence to an application and category. You can assign sequence numbers to journal entries, but only to those journals created for actual transactions. You can choose to assign sequence numbers to journal entries that General Ledger automatically creates, or to journal entries you enter manually in the Enter Journals window. General Ledger automatically creates journal entries for actual transactions when you perform the following tasks:
  • Import Journals
  • Reverse Journals
  • Revalue Balances
  • Generate Recurring Journals
  • Generate Mass Allocation Journals
  • Consolidate Sets of Books
Note: You should not assign a manual sequence to an Automatic method.
Navigation path: General Ledger>Setup>Financials>Sequence>Document>Assign

Step#19- Define Security Rules
Define segment value security rules to restrict user access to certain segment values when entering journals, performing online inquiries, and running FSG and some standard reports. Segment value security rules can work alone or with data access set security that secures data in ledgers, balancing segment values, or management segment values.
Navigation path: General Ledger>Setup>Financials>Key>Security>Define